Chat widget as an inbound channel
Do the following to use a chat widget as an inbound channel:
Creating a channel
Click Channels → Inbound → Connect channel on the control panel. Under Other, select Chat widget.
Fill out the following fields:
- Name — specify the channel name.
- Branch — specify the project branch you want to deploy into the channel (
masterby default). You can also select a Git tag or enter a specific commit hash. - Agent — select the customer engagement platform or leave this field empty.
- Deployment — select Automatic (whenever any change made to the project is saved) or Manual (using the Deploy button in the channel description line).
Click Create. Wait for a pop-up window with the deploy result to appear.
Now you have created a widget with the default configuration. JAICP has an easy-to-use graphic constructor you can use to customize the look and feel of your widget. Any updates you make are applied instantly. When you are satisfied with what you see, you can save the configuration and add the chat widget to your website.
Go to Edit chat widget to customize the look and feel of your chat widget.
Edit chat widget
Click the icon in the row with the bot → select Edit channel.
You can customize the graphical interface of your widget in the window that opens. Here, you can configure the following elements of the general look and feel:
- General settings
- Visual design
- Chat title
- Chat window
- Message sending
- Location
- Involvement in conversation
- Sound notifications
- Installation
General settings
- Name — name of the channel; displays in the channel list.
- Token — unique identifier of the bot. Used in the script link to embed the widget on the site.
- Branch — specify the project branch you want to deploy into the channel (
masterby default). You can also select a Git tag or enter a specific commit hash. - Agent — the customer engagement platform to which client requests, if any, will be sent.
- Deployment — select Automatic (whenever any change made to the project is saved) or Manual (using the Deploy button in the channel description line).
- Audience (%) — the percentage of clients who will see the widget on the site.
- Widget close button — when this option is enabled, the widget icon will have a close button. If a user closes the widget, they should refresh the page so that the widget is displayed again.
- Copy project settings — you can apply settings from an existing channel to the new one.
Visual design
Here you can customize:
- Font type
- Font size
- Bot and user avatar size
- Color theme
You can select one of the few color themes.
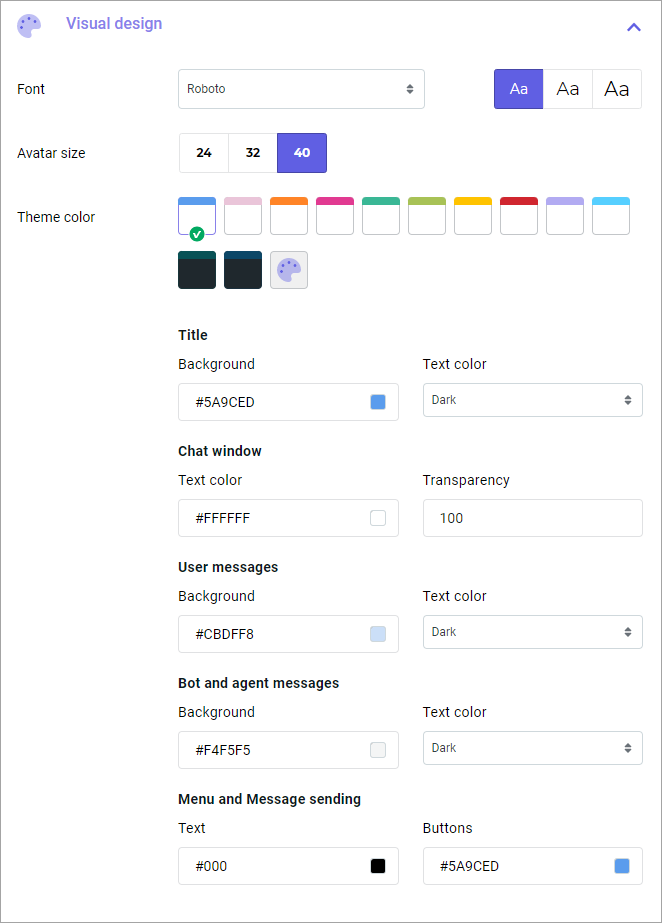
You can create your own color theme. To do this, modify any existing color theme. The new theme is saved as a customized one, and you can return to it at any moment.
All your changes are immediately applied to the widget located in the right corner of the screen. Click it to preview the look of the chat widget.
Chat title
-
Name — specify the name of the chat widget to be displayed in the title.
-
Avatar — load a custom avatar for the chat widget instead of the default image. Bot avatar is the image displayed when the widget is minimized.
Avatar size requirements- Minimum resolution: 60×60 px.
- Maximum size: 80 MB.
Chat window
- Names — select names for chat participants: client, bot, and agent. Messages sent by the agent are identified by the name of the agent from the customer engagement platform. If the name could not be fetched from the customer engagement platform, the name specified in the chat widget configuration is used.
- Avatars — load avatars for chat participants.
- Link preview — specify whether the content of the link will be displayed in the bot message.
- Animation when waiting for bot response — specify whether the bot will simulate typing if the response waiting time is longer than 2 seconds.
Message sending
- Users send messages — select the message send method: by the Enter key and by the button in the chat window OR only by Enter key.
- Disable text input when using buttons — select Yes if you want to prevent clients from entering text messages when using buttons in the script.
- Allow users to send files — the button will appear in the chat that can be used to send files to the bot.
- Input field tip — phrase that will be displayed in the input field until the client starts entering the message.
Location
- On a desktop — position of the widget on the desktop screen: right or bottom indent in pixels. You can immediately see the changes on the screen and adjust the widget to the desired position.
- On a mobile — position of the widget on the mobile screen: left or right.
Involvement in conversation
- Popup message — message from the bot that will pop up in the dialog when preset events occur.
- Open the chat window when — select the time spent by the client on the site or the page after which the chat will open.
- Welcome message in the chat window — select the bot message that will appear in the chat when the window is opened. The session will be started after the first message from the client.
- Show menu buttons — with this option enabled, you can add up to 8 buttons to the chat widget to help the client select the conversation topic right after opening the chat widget. When disabled, the buttons will not be displayed in the chat, but the settings will be saved.
- Display inline buttons above text input field — with this option enabled, inline buttons are displayed next to the regular buttons above the text input field but not in the chat field. Disabled by default.
- Display new message notification — notification of clients about a new message from a bot or agent. It shows up on a tab with the chat widget when the tab is not active. Enabled by default.
- Display unread message count — next to the minimized chat widget, the number of unread messages will be displayed. If the user opens the widget, this counter will reset.
Involvement scenario
- Widget is closed → Preset event occurs → Message pops up next to the closed widget.
- Widget opens and the client closes it → Next event occurs → Widget opens.
- Widget opens and the client does not close it → Next event occurs → Widget closes and opens again.
- Client opens the widget manually → Event occurs → Widget remains open.
Sound notifications
- Sound effect — enable notifications on sending and/or receiving messages.
- Sound — select the notification sound.
Installation
You can copy the chat widget code in the Installation section to add it to your website. Paste the script code between the <head></head> tags on all website pages where the widget will be shown.
The setting for Embedding the widget in a container allows configuring the ID of the container element where the chat widget will be embedded.
Testing your chat widget
You need to deploy the widget for it to be activated on the site.
Click the icon in the row with the bot, then click the chat icon in the bottom right corner.
The chat window will appear at the bottom of the screen where you start the dialog and test your script.
Send the activation/welcome phrase to the bot according to your script. Then a dialog with the bot should start.