Custom dictionaries
In addition to system entities and dictionaries, Aimylogic provides the opportunity to create custom dictionaries so that the bot can recognize the entities from them in clients’ phrases.
Entities
Each entity in the dictionary is basically an entry ID. For each entry, you need to add at least one synonym. Otherwise, your bot will not understand which of the client’s words it should refer to.
All the synonyms should be entered in the initial word form. The bot will recognize other word forms itself.
How to create a dictionary
You can manage custom dictionaries on the Entities page in the script edit mode. In the Entities section, you can see the list of system dictionaries and the Create a dictionary button.
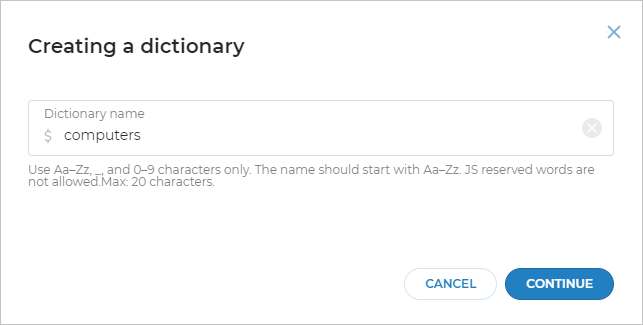
After you click this button, you will see a pop-up window. Enter a new dictionary name here.
After you create a new dictionary, you will be redirected to the dictionary page.
How to use dictionaries
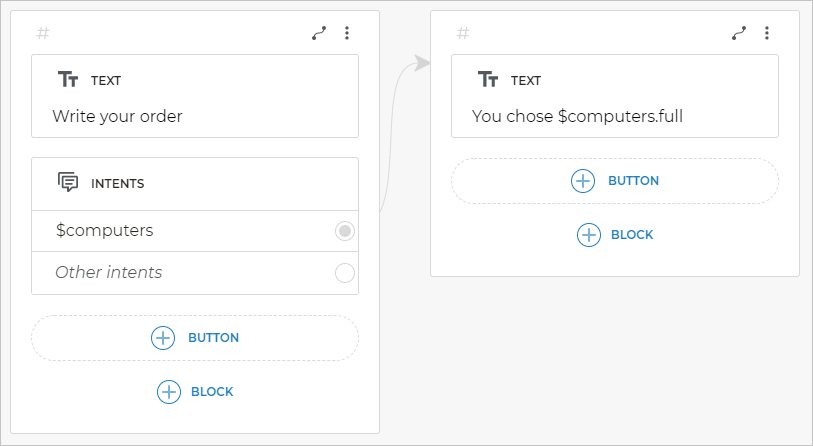
For example, you edit your custom dictionary called $product and add an iPhone entity with i phone and i-phone as synonyms.
Now you can add an Intent block with a template phrase, e.g., I want to buy [a*] $product.
Therefore, if the client writes “I want to buy an i phone”, the bot will automatically recognize the product entity from the phrase, create a $product variable, and put iphone into it. You can use this variable in the same way as other variables. For example, they can request the price using an HTTP request and send it to the client.
How to batch upload multiple entities
You can add your entities manually or batch upload a file that contains them all.
To upload a file with your own entities, click the Create a dictionary button and name your dictionary. On the new page, click Upload dictionary.
You can drag your file into the pop-up window. In the file, the entities should be placed in the first column and their synonyms must be in other columns of the same line.
Such file has a few things worth noting:
- File format should be XLS or CSV.
- File size cannot exceed 1 MB.
- All the entities you have uploaded in the file will be displayed right in the entity list.
- If the file contains any entities or synonyms you have added earlier, they will not be duplicated.
Managing nested dictionaries
Before you drag the file with your dictionary into the pop-up window, you can enable the Add entity values in JSON option.
By default, this option is deactivated. In this case, when uploading a dictionary in CSV file format, you should separate synonyms from each other with commas:
macbook, mackbook, mac, mac book, macos
If you enable the Add entity values in JSON option, you will have an opportunity to upload dictionaries containing not only synonyms, but also their values written in JSON format. Further, you can use fields from the JSON object in the script of your bot.
When using entity values in JSON format, there are some additional requirements to the line format in the file:
- In the line, the entity value in JSON format should be specified first, and synonyms should be written after it.
- If you upload the dictionary in CSV format, you should separate the entity value in JSON format from synonyms with a semicolon, while synonyms should be separated from each other with commas.
Line example for CSV file:
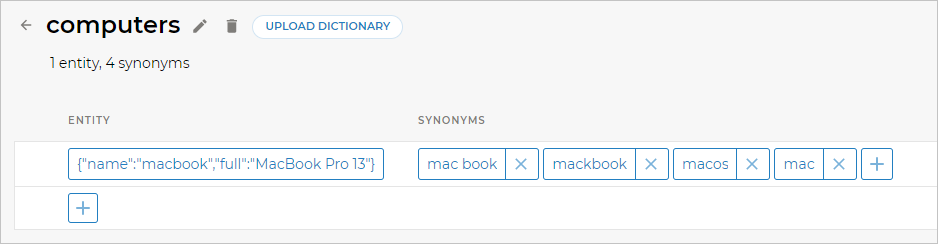
{"name":"macbook","full":"MacBook Pro 13"}; mackbook, mac, mac book, macos
On the dictionary page, such line will be displayed as follows:
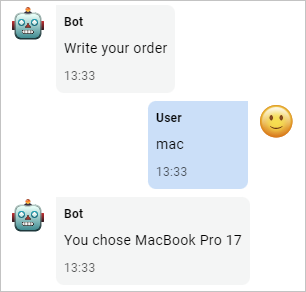
You can use fields from entity values in your script by specifying the field from the JSON object as $<dictionary name>.<field name>:
In this case, the bot will be trying to recognize entities from the $computers dictionary. When it recognizes mac as an entity synonym from this dictionary, it will put mac into the $computers variable, get the full field from the JSON object and reply to the client as follows: