Connect your own account
When you create a telephone channel, you can connect your own third-party speech recognition and synthesis account. Click the ASR/TTS tab and select Create connection in the Connection field. Then select your provider and fill out connection settings.
Please note that there’s no need to re-create your connection if you already use ASR/TTS from another provider. Create a connection, e.g. for ASR, then select your connection from the list under TTS.
Google ASR/TTS
You need to create a JWT Token to connect Google ASR/TTS. To do this:
- Open the Cloud Console and click IAM & Admin in the left panel. Select Service Accounts in the left panel.
- Click Select a project, select the project and click Open.
- Find the row for the account you want to create a key for. In this row, click the icon and select Create key from the dropdown list.
- Select the key type and click Create. The newly created key will be saved to your computer.
Please note that the key format may be different depending on how you create it. Keys created using Cloud Console look as follows:
{
  "type": "service_account",
  "project_id": "project-id",
  "private_key_id": "key-id",
  "private_key": "-----BEGIN PRIVATE KEY-----\nprivate-key\n-----END PRIVATE KEY-----\n",
  "client_email": "service-account-email",
  "client_id": "client-id",
  "auth_uri": "https://accounts.google.com/o/oauth2/auth",
  "token_uri": "https://accounts.google.com/o/oauth2/token",
  "auth_provider_x509_cert_url": "https://www.googleapis.com/oauth2/v1/certs",
  "client_x509_cert_url": "https://www.googleapis.com/robot/v1/metadata/x509/service-account-email"
}
Now load your key to the connection settings when you create a channel in JAICP and click Save.
Yandex ASR/TTS
You will need to create a service account private key and to copy IDs of your directory, public key and service account to connect Yandex ASR/TTS.
Service account private key
If you do not have a service account yet, create it and assign roles to it.
To create a service account private key:
- Go to the directory your service account belongs to.
- Click the Service accounts tab.
- Select a service account and click the row with its name.
- Click Create new key in the left pane. Select Create authorized key.
- Specify the key description to make it easier to find in the control console later.
- Save the identifier and the private key.
Service account private key format:
-----BEGIN PRIVATE KEY-----EXAMPLE1234567G9w0BAQEFAASCBKgwggS
cmQxJjAkBgNVBAoTHVByb2dyZXNzIFNvZnR3YXJlIENvcnBvcmF0aW9uMSAwHgYD
VQQDDBcqLmF3cy10ZXN0LnByb2dyZXNzLmNvbTCCASIwDQYJKoZIhvcNAQEBBQAD
...
EXAMPLE1234567YWxzaGEyZzIuY3JsMIGgBggrBgEFBQcBAQSBkzCBkDBNBggrBgEF
BQcwAoZBaHR0cDovL3NlY3VyZS5nbG9iYWxzaWduLmNvbS9jYWNlcnQvZ3Nvcmdh
z3P668YfhUbKdRF6S42Cg6zn-----END PRIVATE KEY-----
Service account and public key identifiers
- Go to the directory your service account belongs to.
- Click the Service accounts tab.
- Select a service account and click the row with its name.
- You can find your service account ID under Overview.
Service account identifier format:example0mjt06siua65usm. - You can find your public key ID under Authorized keys next to the name of the previously created key.
Public key identifier format:example0mjt06siua65usm.
Directory identifier
- Open the directory page. You can select the directory in the control console start page. Directories for the cloud selected are usually displayed in this page. You may switch to another cloud if you want.
- Get the directory identifier from the directory page URL in the control console:
https://console.cloud.yandex.ru/folders/example1234567— here,example1234567is the directory ID.
Now fill out the fields in the connection settings when you create a channel in JAICP and click Save.
T-Bank ASR
You need to create an authorization token to connect T-Bank ASR. Learn more about creating an authorization token in the T-Bank VoiceKit documentation.
Specify API_KEY for API key and SECRET_KEY for Secret key in the connection settings when you create a channel in JAICP. Click Save.
3iTech ASR/TTS
To connect 3iTech ASR/TTS, you will need to obtain an access token via the 3i VOX platform provided by the vendor.
- Sign up for 3i VOX and confirm your registration.
- Sign in to the 3i VOX website and go to the API tab.
- Click Authorize to open a pop-up for managing your API authorizations.
- Below your account name in the top right corner, click For developers.
- Copy your client ID and client secret and paste them into Username and Password.
- Click Authorize to save the credentials. You may now close this pop-up.
- In the Servers dropdown list, switch the server to
/oauth. - From the oauth2 section, open the
/tokenmethod and click Try it out. - Set the following data in the request body:
grant_type—password.username— your account login.password— your account password.
- Click Execute to perform the request.
If all went well, the response should contain a JSON which looks like this:
{
  "token_type": "Bearer",
  "access_token": "93CF267BB3034CDA8E2B00409C",
  "scope": "vox"
}
access_token value into the Token field.Azure ASR/TTS
To connect Azure ASR/TTS, you will need a Microsoft Azure account.
If you have an enterprise subscription to Microsoft 365, you can also set up access to Azure services via Azure Active Directory, which is included in your subscription for free.
The whole connection process involves the following steps:
- Create a new subscription so that Azure resources become available to your account.
- Azure resources exist within resource groups. Create a new group for your future service.
- In this group, create a new resource which includes the Speech service.
- Use the resource key and region to configure the connection in JAICP.
Skip the appropriate steps if you already have a subscription, resource group, or the necessary resource.
Subscription
Sign in to the Azure portal. In order to use Azure services, including the one providing speech recognition and synthesis, your account will need an active subscription.
To create a new subscription:
- Go to the Subscriptions page.
- Click Add and select the appropriate subscription offer.
- Accept the terms of service.
- Assign a billing account if your subscription is a paid one.
Refer to your directory administrator if you don’t have the permissions to manage subscriptions in your directory.
Resource group
All related Azure resources are created within resource groups.
To create a new resource group:
-
Go to the Resource groups page and click Create.
-
Fill out all fields on the Basics tab:
-
The Subscription which the resource group will be assigned to.
-
The Resource group name.
-
The Region where the resource group infrastructure will be located.
tipThe recommended option is to select a region closest to the infrastructure which will utilize the service: this will help reduce network latency. You should also bear in mind the data processing regulations in your local jurisdiction. For installations based in Europe,
germanywestcentralis the optimal choice.
-
-
Fill out the Tags tab if necessary.
-
Click Review + create, then Create. The resource group will be created.
Resource
In the newly created group, create a resource which will incorporate the Speech service.
- Go to the new resource group and click Create.
- Find and select Speech in the service marketplace.
- Fill out all fields on the Basics tab:
- The Subscription, Resource group, and Region should be the same as for the resource group.
- The Name of the new resource.
- The resource Pricing tier (learn more about pricing here).
- On the Network tab, leave the public access on. Fill out the other tabs if necessary.
- Click Review + create, then Create. The resource will be created and deployed.
Azure connection settings
Now everything is ready to create and set up the connection.
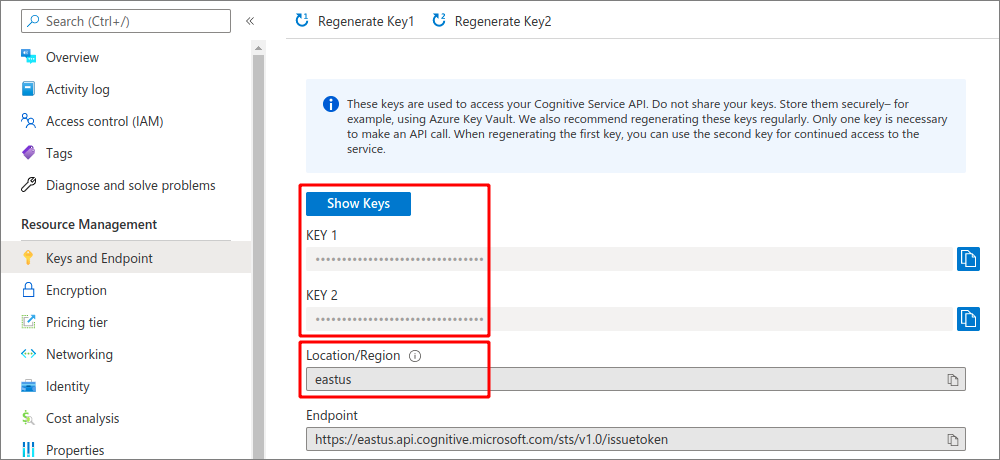
After creating the resource, click Go to resource and navigate to the Keys and Endpoint tab. Use the data from this page to configure the ASR/TTS connection in JAICP:
- The Resource key can be any of the two available keys.
- The Resource region should match the region where the resource is located.
The fact that there are two keys helps ensure the connection stability. If you need to regenerate one of the keys, use the other key for the connection so that it doesn’t get disrupted.
Kaldi ASR
You can deploy your own speech recognition service based on the Kaldi open-source toolkit and connect it to your JAICP projects. JAICP will be compatible with your service implementation if it follows the Yandex Speechkit v2 protocol. Keep this in mind when developing your service or adapting an existing one.
When creating a channel in JAICP and setting up the connection, specify the service URL and the API key for authorizing service calls (if there is one).
ASM Solutions ASR
To connect ASM Solutions ASR, you will need to obtain an API access token. You can contact the vendor by yourself or through your Just AI account manager.
After you save the connection, you will be able to select one of the speech recognition models accessible by your token.
ElevenLabs TTS
ElevenLabs is a cloud-based service that synthesizes realistic speech in different languages.
The ElevenLabs website is not available for Russian IP addresses.
-
Create an API key in ElevenLabs.
-
In ElevenLabs, configure the permissions for the API key. In the Endpoints section, select:
- Text to Speech — Access.
- Voices — Read.
These permissions are required for the connection to work.
-
When creating a connection in JAICP, specify the key in the XI-API-KEY parameter.
TTS settings
On the TTS tab, the following settings are available:
-
Voice for speech synthesis. The list displays the first 100 voices from your account. Start typing a name to find a voice — even if it is not displayed in the list.
-
Model used for speech synthesis.
- eleven_turbo_v2_5: a model with a good balance between speech quality and generation speed.
- eleven_flash_v2_5: a fast model with minimal latency.
- eleven_multilingual_v2: a model with high synthesis quality, but with higher latency and a higher price.
-
Stability: controls voice stability and synthesis variation. At low values the voice sounds emotional, at high values it sounds monotonous.
-
Similarity boost: controls how closely the AI should imitate the original voice.
-
Style: enhances the voice’s unique traits for a more expressive delivery. Values above
0require more resources and might increase latency. -
Speed: controls the speech rate. The higher the value, the faster the speech will be.
- ElevenLabs supports many different languages.
- The provider itself determines the synthesis language based on the received text. You do not need to specify the language manually.
- Some voices might have accents.