How to create a chatbot in the visual aditor
Chatbots are a popular instrument when it comes to making your business workflows easier. They can perform routine tasks so that you have more time for creative work. A well-built chatbot will automatically answer the client’s requests.
How do I start?
In order to build your first chatbot, sign up for Aimylogic and confirm your email. Now, you are on the Aimylogic home page.
All the chatbots you create will be displayed here. Your scripts for call campaigns will be listed in the Calls tab.
For your bot to perform correctly, you need to:
- Thoroughly think through and build the script in the Aimylogic visual editor.
- Carefully test the script.
- Publish your chatbot in the channel where the bot will talk to your clients.
- Analyze your bot’s results and improve your script on a regular basis.
Build the script
First, let’s create a script. On the Chatbots tab, click Create a bot.
In the pop-up window, enter your bot’s name and choose the script language.
After you have created your script, you will see an empty page with the block menu.
Blocks are the constituent parts of all Aimylogic scripts. Each block is an action that the bot performs: it can be a greeting, sending an image, or receiving an order from the client.
Blocks can be divided into three groups:
- Bot response — content which the bot sends to the client in the chat — text messages, files, etc.
- User says — supposed client’s responses to the bot’s messages which are recognized with the help of intents. You can either choose a build-in intent or create your own.
- Actions — bot’s reactions and actions, except messages. For example, transferring the dialog to an agent or ending the script.
One or a few blocks can be added to a screen. A screen is a state of your bot, within which it performs an action or a set of actions.
Let’s create a simple script that will:
- greet the client;
- request the client’s name;
- send a message containing the client’s name to the client;
- say goodbye to the client.
This script will consist of five blocks divided into three screens.
Greet
On the first screen, the bot will greet the client and wait for the client’s greeting.
-
Choose the Text block from the block menu and enter the bot’s greeting, e.g., “Hi” or “Hello”. You can add a few different phrases so that the bot can randomly pick one. To add a phrase, click Add variant and write your phrase in the new field. Click Save.
-
Now, the bot has to accept the client’s greeting. On the same screen, click + Block → More blocks → Greeting. The Greeting intent will be added to the screen.
Built-in intents are a set of typical client responses, e.g., agreement or gratitude. When you add a built-in intent, you do not need to think of possible client reactions.

Request
After the client has sent their greeting, the bot has to request the client’s name. Then the bot saves the client’s name and sends the message with it to the client.
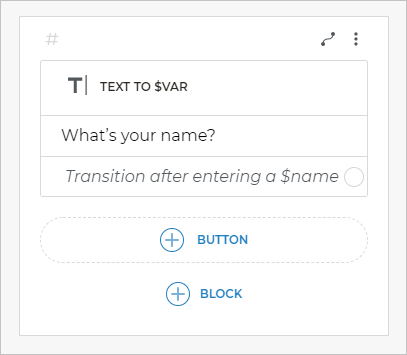
To do this, add a new screen with the text to $var block. You can find it in the More blocks submenu. This block uses the client’s answer to declare a new variable that can further be used in the script.
While adding the text to $var block, fill in the fields:
- In the Message field, enter the bot’s request for the client’s name, e.g., “What’s your name”.
- In the Variable name field, enter the name for the variable. It can include letters of the Latin alphabet or numbers, but no spaces. Here you can use the
nameword as a variable name.
Click Save.
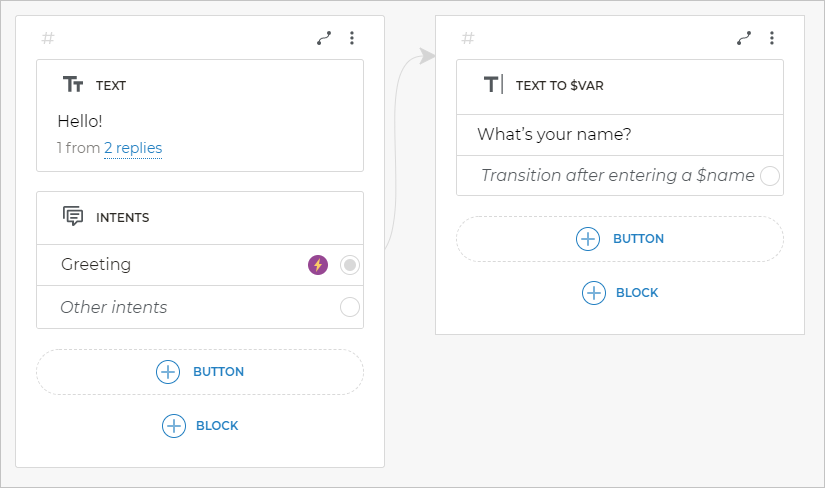
Connect the screens
Now you have two screens in the script, which are not connected to each other. Connections between screens make the bot understand the order of screen execution, so every screen in your script should have a connection to another screen.
So as the bot should ask the client’s name only after the client has greeted the bot, you should make a connection from the Greeting intent to the second screen.
To do this, hover the mouse over the white circle in the Greeting field, press the mouse button, and drag it to the text to $var block.
Now, after getting the client’s greeting, the bot will ask the question.
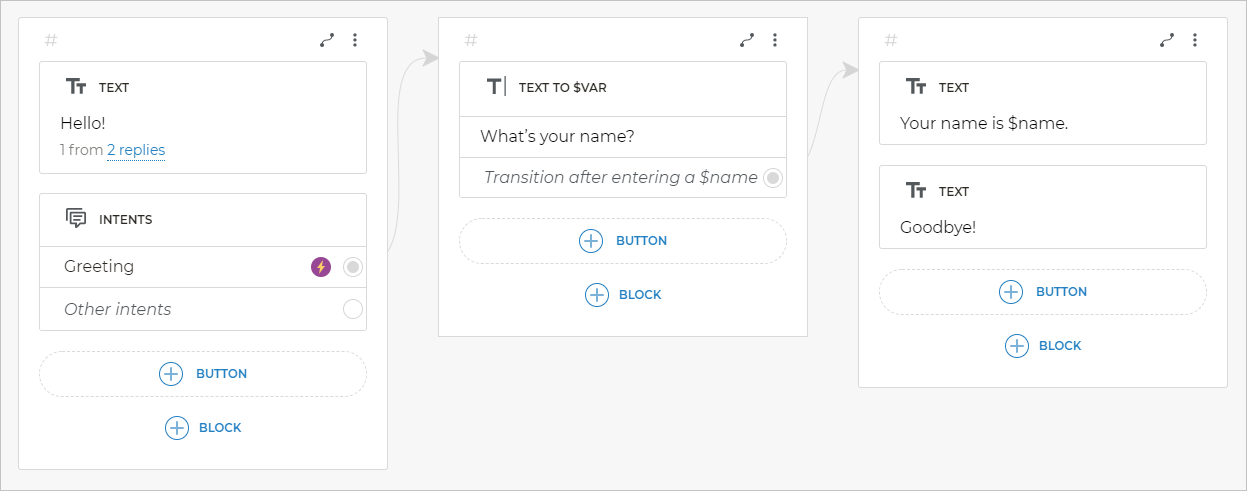
Send a message
In this step, you will create the final screen where the bot will send the client a message with the client’s name.
Add a new screen with the Text block containing Your name is $name. In this message, $name is the variable we have added earlier. In the dialog, it will be replaced with the name sent by the client in the message.
So as we do not want the bot to say anything else, you can add one more Text block saying “Goodbye!” to the final screen.
Connect the Transition after entering $name option from the second screen with the third screen.
The script is ready. It should look like this:
Test the script
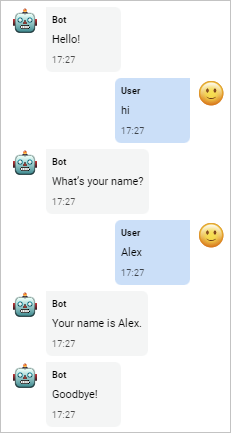
After you have completed the script, you need to test it. You can do this by clicking the Test button in the top panel.
You will see a widget where the bot will greet you. Reply with a greeting phrase and write your name when the bot asks for it.
The script test will look like this:
The more complex the script is, the more thorough the testing should be. During the testing, check all script branches.
Publish the bot
At this moment, the script you have created is not accessible to anyone but you. For the clients to communicate with your bot, you have to publish it in one of our channels.
A channel is an interface between the client and the bot. It can be a messenger, a CRM widget, a Telegram chat, or something else.
Let’s publish the bot in a chat widget. The chat widget is a chat box you see on websites where you can talk to the agent.
To publish your bot, click Publish in the top right corner. You will be redirected to the Channels page. The channels are divided into groups according to their type and function.
In the Messengers, social media, and API group, the first option is Chat widget. It is the channel we are going to use for the bot.
Click Chat widget in the list, then click Connect in the pop-up window. Chat widget will appear in the list of connected channels. Wait till the channel has the Channel connected status, then click Get script. Now you can paste the script to your website to add the chat widget.
You can post Aimylogic bots on many different channels. The most popular of them are:
Analysis and improvements
No matter how thoroughly you have built your script, there are always clients who might give an unexpected answer to a regular question.
To help you analyze your Aimylogic scripts, we recommend you to use the Statistics and Dialogs sections.
