How to create custom action tags
JAICP has a number of built-in action tags, which cover some of the actions frequently performed in bot scripts. For example, they can make the bot send an HTTP request or transfer the dialog to an agent.
This article is a step-by-step tutorial describing how to develop a simple tag which:
- Accepts two numbers and reply format as its parameters.
- Makes the bot reply with the sum value in the specified format.
To develop the tag:
- Write a script for your tag.
- Configure the tag settings in a separate JSON file.
- Specify the path to the JSON file in
chatbot.yaml. - Use the tag in your script.
Step 1. Write the tag script
- Sign in to JAICP and select the necessary project.
- From the sidebar, navigate to Editor → Code.
- In the
srcdirectory, add a subdirectory for action tags, such asblocks. - In the
blocksdirectory, add aSumTwoNumberssubdirectory containing a file calledblock.sc. - Write the script for your tag and save it.
theme: /Blocks

    state: SumTwoNumbers
        script:
            # 1
            $temp.numberOne = $request.data.args.numberOne;
            $temp.numberTwo = $request.data.args.numberTwo;
            $temp.answerFormat = $request.data.args.answerFormat;
            # 2
            $temp.result = parseFloat($temp.numberOne) + parseFloat($temp.numberTwo);
        # 3
        if: !isNaN($temp.result)
            # 4
            if: $temp.answerFormat === "number"
                a: {{$temp.result}}
            elseif: $temp.answerFormat === "full"
                a: {{$temp.numberOne}} + {{$temp.numberTwo}} = {{$temp.result}}
            # 5
            if: $request.data.args.okState
                go!: {{$request.data.args.okState}}
        # 6
        elseif: $request.data.args.errorState
            go!: {{$request.data.args.errorState}}
        else:
            a: I don’t know how to calculate {{$temp.numberOne}} + {{$temp.numberTwo}}.
Let’s go over the script code:
-
In the state from which the tag script begins, the values of tag parameters can be extracted via the
$request.data.argsobject. The values ofnumberOne,numberTwo, andanswerFormatare copied over to$tempfor more convenient access. -
All parameter values have a string type. Before using them for calculations,
numberOneandnumberTwoneed to be converted to numbers. This is done using theparseFloatbuilt-in function. The numbers are then added to one another, and the sum is stored in$temp.result. -
Next, there is a check for a corner case that the parameters couldn’t be converted to numbers, which makes the sum have the value of
NaN. If the value is notNaN, the bot replies with the sum value in the specified format. -
If
answerFormatis set to"number", the bot replies with the sum only, for example: “7”. IfanswerFormatis set to"full", the bot replies with the full expression, for example: “3 + 4 = 7”. -
The best way to design custom tags is to include a way to specify the state in the main script where the bot should return after the action. The
SumTwoNumberstag supports two additional parameters:okStateanderrorState. If the bot successfully calculated the sum and theokStateparameter is defined, the script goes to that state. -
If the bot failed to calculate the sum and
errorStateis defined, the script goes to that state. If neitherokStatenorerrorStateis defined, the bot reports an error instead.
Step 2. Configure the tag settings
To use the above script as a action tag, you need to describe it in a special JSON settings file.
- In the same
SumTwoNumbersdirectory, create another file calledblock.json. - Add a JSON object with the properties below into this file. Unless said otherwise, all properties are required.
Tag settings
| Property | Type | Description |
|---|---|---|
tagName | String | Action tag name. |
startState | String | The state from which the tag script will start executing. |
scenarioFile | String | The path to the script file, relative to the src directory. |
Parameter settings
| Property | Type | Description |
|---|---|---|
parameters | Array of objects | The parameters that can be passed to the tag. |
parameters[].name | String | Parameter name. |
parameters[].type | String | Parameter type. |
parameters[].required | Boolean | Indicates if the parameter is required. |
Parameter types
| Type | Description | Example value |
|---|---|---|
string | String | Hello, world! |
html | String with HTML markup | Hello, <b>world</b>! |
integer | Number | 3.14 |
bool | Boolean | false |
stringArray | Array of strings | ["Hello", "world"] |
nameValueList | Array of objects with the name and value properties | [{"name": "hello", "value": "world"}] |
json | Object | {"hello": "world"} |
state | Path to a state | /Start |
Regardless of the declared type, the values of all parameters are stored in $request.data.args as strings.
To make the action tag script work with them properly, use type conversions:
boolparameters can be cast to Boolean values using theBooleanconstructor.integerparameters can be cast to numbers using eitherparseIntorparseFloat.stringArray,nameValueList, andjsonparameters can be cast to objects usingJSON.parse.
List of valid parameter values
In the parameters[].userInterfaceField property, you can specify a list of valid values for a parameter. In this case:
- If you specify a value not from the list in the script, the bot deployment error will occur. You cannot specify a JavaScript expression as a value for such parameter.
- In the J‑Graph visual editor, only values from this list can be selected for the parameter.
| Property | Type | Description |
|---|---|---|
parameters[].userInterfaceField | Object | Settings for the parameter valid values. Optional property. |
parameters[].userInterfaceField.type | String | Always specify the "select" value. |
parameters[].userInterfaceField.options[] | Array of objects | Valid parameter values. |
parameters[].userInterfaceField.options[].value | String | Parameter value. Always pass the value as a string. |
How to convert a value to a string
- Enclose the value in double quotation marks (
"). - If the value contains double quotation marks, escape them with the
\character.
Examples:
| Initial value | String |
|---|---|
10 | "10" |
["example1", "example2"] | "[\"example1\", \"example2\"]" |
J‑Graph appearance settings
In the J‑Graph visual editor, action tags correspond to action blocks. The properties below allow configuring how they are displayed in J‑Graph. All of these properties are optional.
As their value, all properties accept an object with the eng key.
Its value is used for displaying the JAICP interface in English.
| Property | Description |
|---|---|
caption | Action display name. If not set, the action tag name (from the tagName property) will be used instead. |
description | Action description. It is displayed as an attention block in the action editing menu. |
hint | Action hint. It is displayed as a hint when hovering over the action in the list of all reactions. |
parameters[].localization | Parameter display name. If not set, the parameter name itself (from the name property) will be used instead. |
parameters[].description | Parameter description. It is displayed as a hint when hovering on the parameter name. |
parameters[].userInterfaceField.options[].localization | The parameter value name in the valid values list. If no name is specified, the parameter value (value) is used. |
Settings example
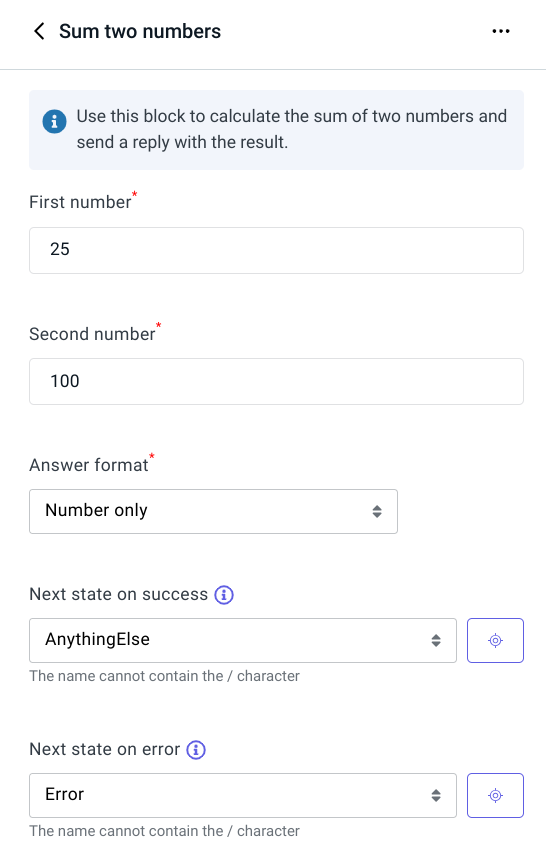
This is an example JSON file for the number addition script developed on step 1:
{
    "tagName": "SumTwoNumbers",
    "startState": "/Blocks/SumTwoNumbers",
    "scenarioFile": "blocks/SumTwoNumbers/block.sc",
    "caption": {
        "eng": "Sum two numbers"
    },
    "description": {
        "eng": "Use this block to calculate the sum of two numbers and send a reply with the result."
    },
    "hint": {
        "eng": "Calculate the sum of two numbers and send a reply with the result"
    },
    "parameters": [
        {
            "name": "numberOne",
            "type": "integer",
            "required": true,
            "localization": {
                "eng": "First number"
            }
        },
        {
            "name": "numberTwo",
            "type": "integer",
            "required": true,
            "localization": {
                "eng": "Second number"
            }
        },
        {
            "name": "answerFormat",
            "type": "string",
            "required": true,
            "localization": {
                "eng": "Answer format"
            },
            "userInterfaceField": {
                "type": "select",
                "options": [
                    {
                        "value": "number",
                        "localization": {
                            "eng": "Number only"
                        }
                    },
                    {
                        "value": "full",
                        "localization": {
                            "eng": "Full expression"
                        }
                    }
                ]
            }
        },
        {
            "name": "okState",
            "type": "state",
            "required": false,
            "localization": {
                "eng": "Next state on success"
            },
            "description": {
                "eng": "The bot will go to this state if it successfully calculates the sum."
            }
        },
        {
            "name": "errorState",
            "type": "state",
            "required": false,
            "localization": {
                "eng": "Next state on error"
            },
            "description": {
                "eng": "The bot will go to this state if it fails to calculate the sum."
            }
        }
    ]
}
Step 3. Specify the JSON file path in chatbot.yaml
- In the
chatbot.yamlconfiguration file, create acustomTagssection if it doesn’t exist yet. - In this section, specify the path to the JSON file relative to the project root directory.
customTags:
  - src/blocks/SumTwoNumbers/block.json
Step 4. Use the tag in your script
In the code editor
-
Go to the necessary bot script file, such as
main.sc. -
Create a new state for your action tag and specify its parameters, for example:
state: SumTwoNumbers
    q!: * @duckling.number::numberOne (plus/$regex<\+>) @duckling.number::numberTwo [equals] *
    SumTwoNumbers:
        numberOne = {{$parseTree._numberOne}}
        numberTwo = {{$parseTree._numberTwo}}
        answerFormat = number
        okState = /AnythingElse

state: AnythingElse
a: Should I calculate anything else for you?- The state is triggered by requests like two plus three.
Two numbers are extracted from the request using the
@duckling.numberentity and passed to the tag. SumTwoNumbersis the action tag name. It corresponds to thetagNamevalue parameter in the JSON settings file.numberOne,numberTwo,answerFormat, andokStateare the action tag parameters as defined in the JSON file. Their values can be different every time the tag is used.
- The state is triggered by requests like two plus three.
Two numbers are extracted from the request using the
In the J‑Graph visual editor
- From the sidebar, navigate to Editor → J‑Graph.
- Create a new state on the canvas.
- In the state editing menu, select All reactions.
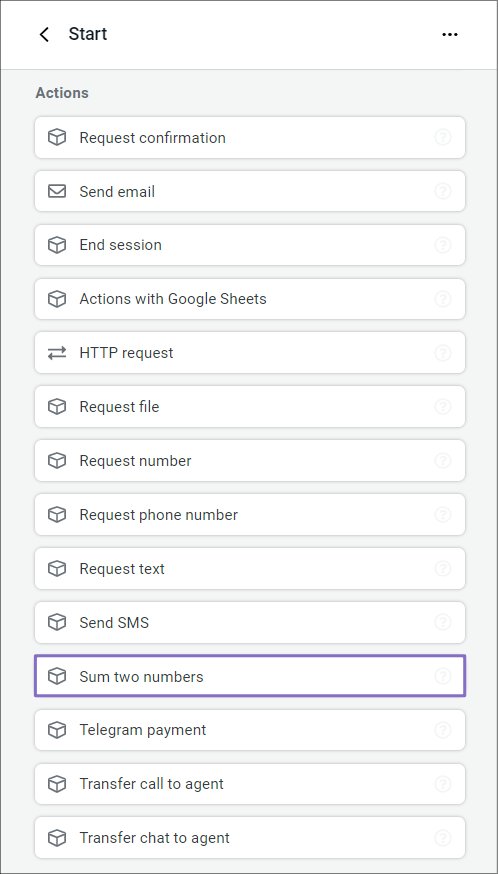
- Select the new Sum two numbers action from the reactions list.
- Fill out the action parameters and save the block.