How to customize your chat widget
Aimylogic allows you to customize your chat widget without using CSS. When customizing your chat widget, you can see how changes look and work.
To edit the chat widget settings, go to the Channels page and click the icon next to the connected Chat widget channel.
You can change the following:
- Visual design
- Chat title
- Chat window
- Message sending
- Location
- Involvement in conversation
- Sound notifications
- Additional settings
- Installation
Visual design
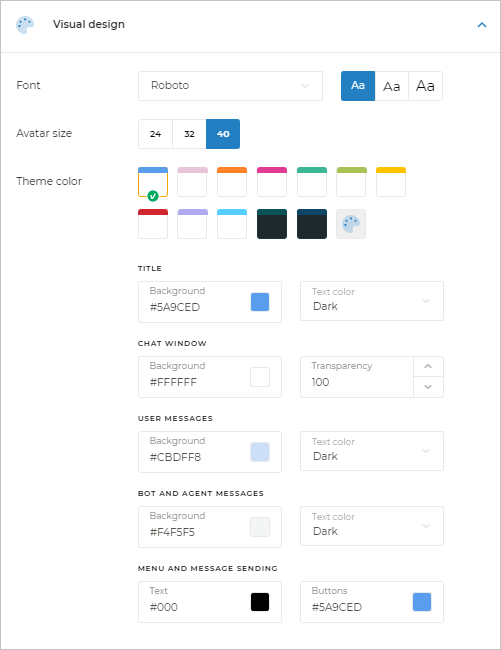
Visual design settings:
- font;
- font size;
- avatar size;
- theme color.
There are a few color themes to choose from.
You can also create your custom color theme. To do this, make changes to any of the built-in color themes. The new theme will be saved under the custom theme icon.

Chat title
Chat title settings:
- chatbot name;
- avatar for the chatbot.
Chat window
Chat window settings:
- Show names:
- whether to show names;
- which name will the bot, agent, and client have.
- Avatars:
- whether to show avatars;
- which avatars will the bot, agent, and client have.
-
Link preview. Whether the content of the link will be displayed in the bot message.
-
Animation when waiting for bot response. Whether the bot will simulate typing if the response waiting time is longer than 2 seconds.
Message sending
Message sending settings:
- How to send messages:
- only by pressing Enter;
- either by pressing Enter or by clicking the Send button in the text input field.
- Disable text input when using buttons.
- Show the Attach File icon in the text input field.
- Message placeholder in the text input field.
Location
Location settings:
- For desktop:
- Right indent (in pixels);
- Bottom indent (in pixels).
- For mobile:
- Position of the chat widget icon (bottom-left or bottom-right corner).
Involvement in conversation
Involvement in conversation settings:
-
Popup message:
- whether to show the message next to the chat widget icon;
- popup message text;
- show the message after […] seconds of client’s staying on the website.
-
Open the chat window when:
- the client has spent more than […] seconds on the website;
- the client has spent more than […] seconds on the page.
-
Welcome message in the chat window:
- whether to show the message;
- welcome message text;
- whether to show menu buttons;
- text for buttons.
info- The Welcome message in the chat window option helps you manage your unique user count. When disabled, a user is counted as soon as they open the chat widget. When enabled, they’re only counted after responding to the welcome message.
- If you created your bot using the skill builder, enabling this option will lead to duplicate welcome messages, since the skill already has its own welcome message.
With the Show menu buttons option enabled, you can add up to 12 buttons to the chat widget to help the client select the conversation topic right after opening the chat widget. When disabled, the buttons will not be displayed in the chat, but the settings will be saved.
You can also make an inline button and pass a link to any website into it. To do this, click the icon on the selected button.
-
Display inline buttons above text input field:
- When enabled, inline buttons will be displayed next to the regular buttons above the text input field.
- When disabled, inline buttons will be displayed in the chat field.
-
Display new message notification (enabled by default):
- If enabled, a new message notification will be displayed on a tab even if the tab is not active.
- If disabled, a new message will be displayed only on a chat widget tab when the tab is active.
Sound notifications
You can enable sound notifications on sending and receiving messages. To do this, set the following:
- Sound effect for:
- client and bot messages;
- bot messages;
- client messages;
- no messages.
- Sound:
- Juntos;
- For sure;
- Just maybe.
Additional settings
Additional settings:
- Set a percentage of clients who will see the chat widget.
- Enable the widget close button if necessary. If a user closes the widget, they should refresh the page so that the widget is displayed again.
- Copy the settings from another project. If you already have all the settings in another project, you can choose it from the list and all settings will be applied.
Installation
Installation settings:
- Copy the chat widget code for your website.
- Embed the widget in a container on the page and specify the ID of the page element you want to embed the widget in.